Doing static versions.

Most websites are static HTML pages. However, people continue to spin up infrastructure based on a web server, which could run Apache or Nginx. But, you want to keep costs low. You can use DigitalOcean, but I’m an AWS guy, so we’ll do things the AWS way.

So let us talk about the goal. The more you focus on Cloud-based infrastructure, the more you understand it’s not about the hardware, instead it is the software or code. And being able to version control your system is fantastic. This goes along with being able to version your infrastructure, as your hardware is no longer a lovely little pet you maintain, it has become the cattle that you slaughter and eat. Meaning you don’t care about it; if it becomes an issue, you delete it and move on.

If you plan on doing a Blog site, your best bet is to pay the small yearly cost to WordPress.com; they do a fantastic job. But, most websites are just posting simple information. Think of a restaurant. How often does that experience change? The menu might change weekly, monthly. But contact information, location, etc.. does not. This is where a static hosted web page is perfect. 

Now since we all love Google, I did a quick search using these keywords:

automate static S3 GitHub

AWS is very powerful, and someone else already made a blog post covering what I wanted to explain:

Automate static website deployment from Github to S3 using AWS CodePipeline – sithum DevOps

So you follow that post, it will do everything you need – if you’re using GitHub. It shows how to create a code pipeline that will commit updates to S3 when you submit changes to your GitHub project. A couple of parts are left out, for example, SNS, Amazon Simple Notification Service. This is used to set up Email or SMS notices for your pipeline, i.e., success, fail, or manual intervention is needed if something happens to your pipeline. And, you need to have your S3 buckets already created. I’ll post another article going over what I would call “AWS 101”, which will outline security, billing, and alert notices to do first in your AWS Account. 

Another little thing to add to this pipeline would be to invalidate CloudFront data(CloudFront is a CDN, that distributes your content from an Origin-yours being S3-to geographically located servers around the globe). Just because you updated S3 with newer code doesn’t mean you would be sending the most up-to-date information, that is, if you’re using CloudFront. With CloudFront, you would need to let the content expire on those geographic servers, usually 24 hours. Then a new pull from your Origin would be done, or you would process an invalidate request-which deletes that file(s) from the cache on the servers(however, this can be costly if you are continually invalidating single files all the time). But talking about CloudFront is for another post. 

Also, keep in mind each time you process your pipeline, i.e., submit updates. This will push new content into S3. And, having an “active pipeline” does cost $1.00/Monthly. Now, this cost does not include the other service costs that might be associated with running the pipeline, i.e., transit data costs etc… So keep that in mind.
I’m going to leave it that way.

After doing more research on roaming, and diving deeper into the beautiful parts of 802.11k/r/v and OKC. I’m going to leave all the previous blog posts just the way they are. And that reason is, I know they’re not 110% correct; however, they have the spirit of Wireless involved and point out things to consider, test, and evaluate in your environment. Lots of blog posts exist that say “do this, to resolve this,” but I feel they do not ask questions, but tell you this tool does this, vs. examing all parts involved.

So, I’m going to leave it that way. And, if you’re new to Wireless, I feel this will allow you to think about things and examine everything on your wireless network, and your client device being an import ever-evolving piece.

All the bells, or having 802.11k/r/v on.

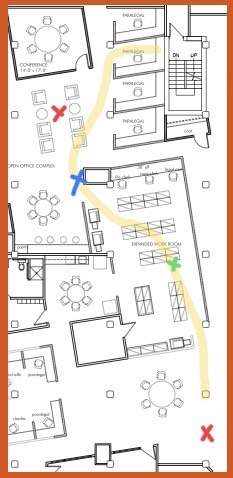
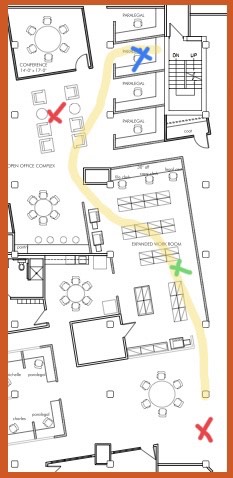
Now we’ll turn on 802.11r and do the same thing as we did outline in this post. Our test SSID has 802.11k/r/v enabled, and I instantly noticed with 11r enabled how quickly my client switched from one AP to another. I noticed this when I was walking away from Access Point c4 and where I rejoined AP 23. As I walked away from AP 23, I joined c4 in roughly the same spot as yesterday. However, when I walked back towards AP 23, I joined closer to the AP vs. when I walked past the AP. 

So here we see a little section of my office, I started in the back(the top of the image) and walked towards AP c4, which is on the bottom of the image. The little red “X” marks the AP locations, 23 at the top and c4 at the bottom. As I walked towards c4, the green X marks when I saw my device change. I then waited about three seconds; then I walked back to AP 23. The blue X is where I saw the client change to AP 23.

Now, if we look at the join locations with when 11r disabled, we’ll see something different.

I joined AP c4 in roughly the same spot, but when I walked back to AP 23, I didn’t rejoin until almost the same spot as where I started.

It shows that over two days, my device would join AP c4 in roughly the same spot. However, AP 23 acted differently. Reasons could be my device went to sleep, and I didn’t notice as I walked back around AP 23, which would cause it to join at a later physical spot.

Or, maybe the device did roam correctly, but thought it needed to stay on AP c4 longer, the sticky client scenario — remember client devices ultimately make the roaming decision, not the Access Points.

Looking anyways…

In a previous blog post, I was going to capture using two Access Points with 802.11r disabled. It was disabled but, 802.11v was baked into the firmware. This slowed me down(not in the roaming sense, how I was doing my setup). But I needed to continue with this test to see how fast things moved. So if you look back at this post, it talks about what devices and how I created the SSID to look. I did disable 802.11r, but I’m still going to use 802.1X(capital X). Why not just WPA2, well, because I’m using RADIUS. And, the end goal is to see about using a Cloud RADIUS.

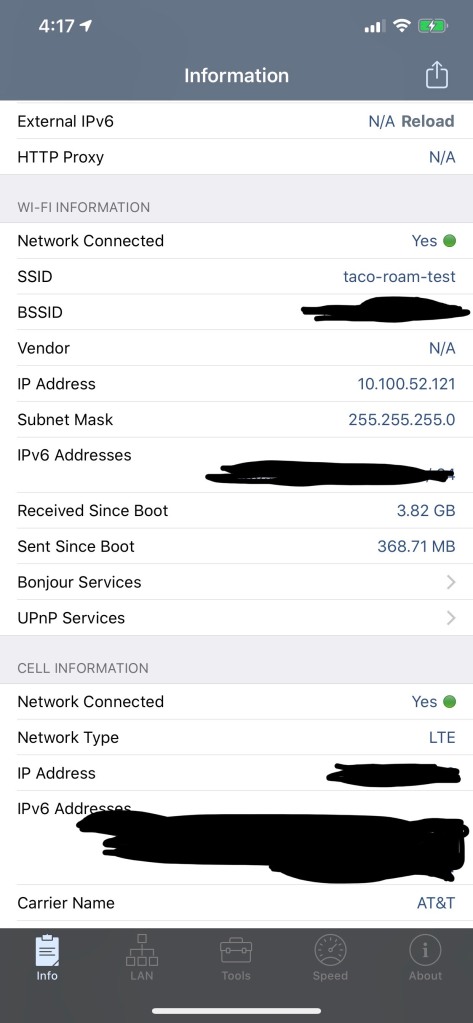
So, I have my test setup, and I’m walking from one Access Point to the other. I nice handy tool I use to see if I have roamed visually is called Network Analyzer. It quickly shows my current BSSID and also has an IP block Scanner. So somewhat handy.

During my little walk, I had my MacBook capturing the channel I had set both Access Points on. And, used Airtool for the packet capture.

Now that I have my frames captured, in the wireless world, packets are called frames. I can narrow down what to look for as my capture was over 14,000 frames(yeah, I have lots of other things on these APs, 10 Chromecast devices are very, very chatty).

But what do I look for? Since we’re moving between Access Points, you need to look for what is called Association and Reassociation requests.

You loaded your pcap into Wireshark, now time to filter down for what you’re looking for.

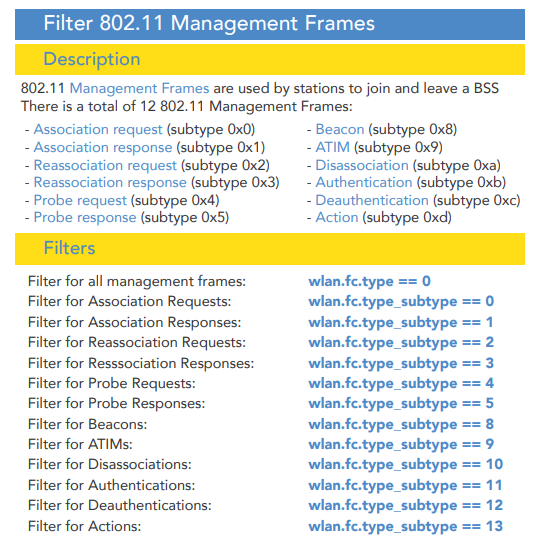
And, thanks to François Vergès for having this handy “Wireshark Most Common 802.11 Filters” PDF, searching is now 100% easier in Wireshark.

wlan.fc.type_subtype == 0x0

wlan.fc.type_subtype == 0x2

From the handy chart, we need those two options, if you combine those, you should have something that looks like this:

(wlan.fc.type_subtype == 0x0) || (wlan.fc.type_subtype == 0x2)

I see the frames we’re looking for, but now I need to find the MAC of my client.

i.e. wlan.addr == CC:46:D6:00:00:00

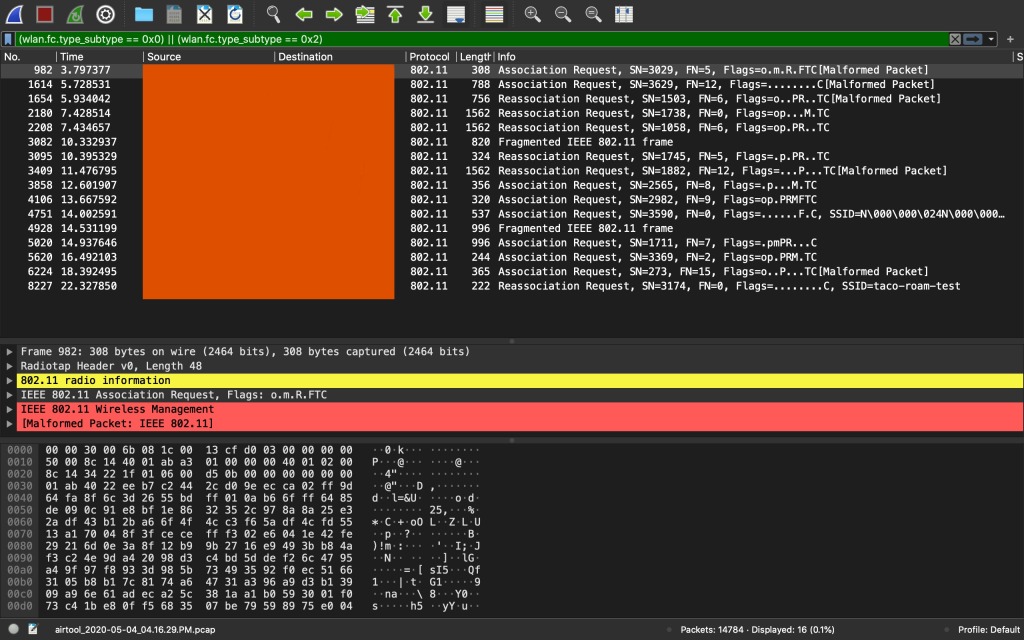
And then we combine all that Wireshark magic and then we’re shown a few lines from the pcap.

(little disclaimer – that first pcap image didn’t have everything I needed so I made another pcap and filtered for what we need.)

So here’s what we have now, with just 802.11v enabled on this “taco-roam-test” SSID. You can see my client device connect to the first Access Point ending in 23, then me walking to the next AP ending in c4, then back to 23.

So about 3.3 seconds in, I join the SSID, then checked to make sure I have an IP address, then switch over to the Network Analyzer app, then start walking towards AP c4. Now once I saw in the Analyzer app that my device changed BSS units, I walked closer to that AP a few more seconds then started walking back towards AP 23. I was trying to walk the same path again. Also, my office is roughly 10,000 Sq ft. I probably walked about halfway between the APs before it switched, which would mean about ~40 feet away from AP 23. Also, both radios are set for 19 dBm(no external antennas).

So, what did we learn, well nothing yet, other than a roam from and back to an Access Point. Well, yeah, we learned about some tools and how to filter with Wireshark. Now I need to enable 802.11r and do it all over again.

Also, here’s a little handy Column you should add to Wireshark, Time Delta. Right-click on a Column section, select Column Preferences. Hit the “+” to add a Column, give it a Title, I called my Time Delta. The type will be Custom, then enter the following in Fields:

frame.time_delta_displayed

Now you have a Column that shows the Time Delta.

Roaming the Fog way or using on-site RADIUS.

So just like the title says, hey, we’re going to see what roaming using on-site RADIUS looks like.

This is our baseline: In our network, we’re going to disable 802.11r, and test using two Access Points on the same channel, because I don’t want to get too technical, and only want to capture on one channel. As only capturing on one channel will make this easier for folks at home. And, my capture device only has one interface anyways. 

We’re going to set up a test SSID; we’ll call it “taco-roam-test”, and we’re going to use 5 GHz, channel 36, and 20 wide. Something easy that you should have at home. 

Now, since we’ll be doing this test using different RADIUS options, this one using an on-site RADIUS. And, the second will be with a Cloud-based RADIUS option. We need to have a constant, and that will be our testing device. 

Our test device will be an iPhone XS Max, running iOS 13.4.1, the reason why I’m using an Apple device, this device is what I have and like. And, my capture device will be a MacBook 2017, space gray if you must know.

Now that we know about the device, we need to understand how Apple does roaming. And, Apple is really good about providing this documentation. Yet, another reason I’m using Apple devices for this “test”. 

So, I ran into a small issue. 

SSID showing 802.11v support.

I want to disable 802.11v support. And, that is baked into my Access Point firmware. So apparently this is used for the keywords of “load balancing”. Since 802.11v is used for BSS Transition, and my client supports 802.11v, my client will have some assistance. Which is what I do not want. Time to find a more generic Access Point.

Do you really love The Cloud?

You really should love The Cloud, if you don’t, well, stop reading. But, I need to use RADIUS with Wireless. And therein lies the rub! Once you try or move things to The Cloud this little part that is considered critical still exists. That little part is RADIUS. 

If you have some Windows Servers still in use, you could be fine. However, with Windows 10 and Azure Active Directory. Why even have on-site servers? Well, that RADIUS part still needs to be around. 

You can do a few different things, you can use JumpCloud that talks to O365/AAD and that works, but you have that little issue of delay for roaming. The other option is using NPS on a Windows Azure AD attached server and placing that in Azure(in The Cloud), or placing an on-site server running NPS attached to your O365/AAD site. That will reduce the delay, but you have on-site servers you need to maintain. 

So you mention the issue with delay, what are you talking about? Well, if you roam you need to authenticate. But you have key caching involved too? Wouldn’t that speed up the roaming? True, but I figure the goal is keep everything below 150 milliseconds round-trip. 

The goal is to be 100% Cloud based using services vs. servers. Why do you want to maintain servers?

Am I fast roaming?

When roaming on a wireless network, in very basic terms, here are some things you should look for. You can roam using what I call a tear down and rebuild, i.e. you’re on a wireless network – you then move out of range of an Access Point and your connection is then destroyed and rebuilt on the next Access Point you join. That’s nice, however, if you’re on a FaceTime call or using a VoIP application you’d like this to be as fast as possible. So here are some things to look for and maybe enable on your wireless network. I’m going to explain some Amendments to 802.11 that you should enable and test on your network. 

The first is 802.11r, in very basic terms this allows your client to move quickly, your wireless infrastructure needs to support this along with the client having support. Now this comes with some interesting side effects. One, being that not everything supports it. Yes, this has been an option for 10 years, however not all client devices know about it and once again, support it. For example, iPhone 4 and above support it, but macOS does not. However, macOS does support caching of keys to smooth that transition when moving between BSS units in the same ESSID. 

Woah? Wait a second, what is BSS and ESSID? OK, let’s step back a little and explain. You’ve heard the term SSID, Service Set ID, this is what you have called your Wireless LAN, i.e. TacoMonkey or FBI Van. Then you have your BSSID, which is Basic Service Set ID. Think of this as multiple Access Points in the same Wireless LAN(technically it’s BSS) using the same name, i.e. SSID. Now an ESSID is the grouping of all those BSS, Basic Service Sets, under the SSID. Lots of times BSSID and ESSID are used interchangeably.

So you have three Access Points, those access points have a BSS and those units all live under an ESSID. Now to route network traffic, each BSS has a MAC address and that MAC address talks to your Client MAC Address. This is how the wireless network knows what Access Point is close to what client and how to move traffic around, because wireless is still Layer 2. 

Second thing to look for, is 802.11k, think of this as moving with some visibility, or where it makes sense, i.e. Assisted Roaming. Instead of the client scanning channels and looking around for the same ESSID, the wireless infrastructure will help and provide that information. Most of the time it will be your connected AP then the next AP that the client will be told about. I’ve heard it’s usually around 10 surrounding APs that a client will get information about. This is different depending on what your infrastructure supports. So take that with a grain of salt. 

And lastly look for 802.11v. Two main things come along with 802.11v, one being power setting information and another being topology information, i.e. how is this network designed(in simple terms). Why would I care about power settings? 

Let us take this example, you have three Access Points in a triangle configuration. Your client is sitting off to one leg of the triangle. If all Access Points in the ESSID are set for 18 dBm, then your client could connect to the furthest physical AP. In some cases that could be fine, however if I’m going to be next to an AP all the time, why not adjust that power a little higher than the others. This will help in assisting where your client should go. A key factor is also understanding how your client will roam, i.e. does it look for a certain RSSI, channel width or preferred wireless band? 

Things to remember, not all devices can work with 802.11r, if you have that enabled on your wireless network and require it, your client device might be unable to connect. In the Cisco world they have an “Adaptive” option instead of “Required” for non-11r supported devices to connect. Now remember with 802.11 devices, the client still chooses where to roam, however with 802.11k/r/v, we influence the client to make better choices. 

Now that you have an idea of what to look for on your wireless network, how do you know if these are enabled? On macOS, it’s very easy, a Mac app called WiFi Explorer is available. Just make sure you head to Preferences and enable the Amendments column. 

A little disclaimer, make sure you check your client devices for support, especially for 802.11r. And, it is best to set up a new SSID to check these settings, also several vendors have 802.11k enabled by default. 

Are you Near, Far or just something else?

Back in 2017, I did a little post on Ekahau — I had never really played around with the software and had some free time. I spent around four hours just messing around. The point is, you can see the placement of our Access Points. Which is in what I will can an “L” shape. That is mostly our walking pattern in the office. On the first post in the series I talked about the AP towards the front of the building, more specially the one by our elevator. This AP has a single purpose, doing the initial connect of our client devices. Which all happen to be made by Apple, so our results should be pretty much the same and Apple has a really good support doc called About wireless roaming for enterprise.

Now, I talked about setting the minimum supported rate to 54Mbps. Would this cause a Near/Far issue? Hold on, what’s a Near/Far issue? Good question, if you just so happen to have the Sybex CWNA-106 book, you can flip to page 413. But if not, here’s a little of what is Near/Far:

Disproportionate transmit power settings between multiple clients may also cause communication problems within a Basic Service Set (BSS). A low powered client station that is at a great distance from the Access Point could become an unheard client if other high-powered stations are very close to that Access Point.

OK, that sounds cool, BUT, you’re talking about just changing the minimum supported rate of an ESS(Extended Service Set, Sybex CWNA-106 page 250) or BSS to 54Mbps. And, the Near/Far issue is talking about disproportionate power on an STA(Station), i.e. Client.

Ahhhh, good point. We just might be learning something here. I hope so. Let me explain what I’m thinking. So you have this AP, that is the same power as the other APs, in theory you should be able to hear it. And, since all of our devices are Apple, then we should be seeing the same thing across the same type of device(all running the latest non-beta iOS, same hardware etc…). Now, I know the real, real world is not 100% static like I’m saying, but just hear me out. Hmm, ok, I’m with you so far, keep going.

So basically if all APs are the same power level, and we’re faithful to the Apple wireless roaming doc, and if you looked at how the APs are placed(talked about on a previous blog post). Then, I should hear at least three, if not all four APs, right?

But, I only see two, sometimes — maybe three APs and that AP at the very front of the building, by the elevator is not heard. So here’s what could be coming into play regarding this: The physical distance to the AP, the line-of-sight propagation from the STA to the AP. And, one could even say you have some FSPL(Free Space Path Loss), hmm, nahh. Also, physical items, i.e. walls–the placement of the APs is in the open region of the office, all open with walls that go maybe six feet high, i.e. dividers, so all the APs are can see each other.

Here’s a couple screen shots showing something interesting. You see two APs, then I moved 10 feet towards the front of the building, same location just 10 feet(on that previous blog post showing the floor-plate, I moved closer to the bottom).

nearfar
four

I now see four Access Points instead of two. OK, so what are you getting at? By changing your minimum supported rate, you in essence could be creating a wall that stops the RF. Huh? That’s not true, RF goes a long, long way. That is correct, but the perceived demodulation of the RF is what counts. Our client devices have tiny little antennas in them. And, by changing the minimum supported rate, you have changed the cell sizing of your access point.

But why would you want to change your cell size? Don’t you need a so called 10-15% overlap from AP to AP for better roaming? Yeah, that’s always a goal, but how do you measure overlap(maybe we can talk about that idea in another post)?

Now, this works for us. But why? The first post in this series, I talked about how we have very little roaming scenarios. And, what *roaming* we do have, we are 100% fine with the slight 2-5 ms time it takes to rebuild the TCP/IP sessions for that STA.

Blah! I still don’t buy it, sounds like crap! Why not just set the minimum supported rate to 24 or 18 and be a smooth roamer? What about the beacons, they travel at the lowest possible rate anyways or do they?

I’m at 54, how about you?

(Upate: This post has been sitting in drafts for well over a year, our network has changed.)

A couple years back, maybe more, I did this–changed a setting to 54Mbps. My office wireless network is set at 54Mbps minimum supported rate. I said heck why not do 54 and see what happens. OK, for the details of what my network is running and why. First off, we run Cisco Meraki wireless, it does exactly what I want and expect. Our network consists of simple L2/L3 designs, pretty cookie-cutter, darn near everything is Cloud based. With being Cloud based we just need WAN access. We have roughly 18 VLANs, even for a few simple things like printers, those go on a dedicated VLAN. Also, I take the approach of “if it has a network port, make it wired”. Along with isolating devices with VLANs, we also run an entire Apple environment, i.e. all iPhone, iPads and MacBooks(generally within 24 months of the latest physical device released–for the most part all latest-gen). With this approach, I don’t have to go around guessing about what wireless card driver versions are installed, did Windows 7/10 overwrite a newer driver etc… (yes, I did mention Windows 7, we have some legal software that is great at the legal process-but sucks otherwise-and it works well on Windows 7).

Now for our physical Access Point placement, I did not have access to Ekahau or any predictive mapping software when our office was planned. But, I did know the walking patterns and how our lawyers operate(I call this part TACO(I’ll blog about that later) or Chapter 2 in the Certitrek CWDP-302 book). They generally *do not roam*. What?? What do you mean?

Let me explain a little on that. First off, people enter the first floor, access the elevator for the second floor(our office is the entire second floor of a three story building). I have an access point roughly 10 feet from the elevator, that is pretty much meant to get the device connected. Hardly any usage on that AP is done, maybe a quick email or two if the elevator is slow that day. That AP is also on the opposite side of the building that the most used offices are. Also, I know that the mobile devices are usually tossed in a pocket or backpack during this time. Sometimes, those devices are not even touched until sitting on the desk in the person’s office. And, in that case they will connect to the AP that is right outside their office.

Knowing how the devices are used, I placed the Access Points in relation to the office usage walking patterns. huh? I knew how people will walk around in the office, how they will be using a mobile device and what would be used on that mobile device. Lucky for me, I know that our mobiles devices are used for consumption. Lots of PDFs(mostly looking at one or two that are 100’s of pages), along with some Words Docs, hardly any VoIP and/or video used in a “walking around” sense. Very little Facetime/Video, however lots of cell calling(but that’s not my problem).

Now that you have a little background of our network. You can see why I’m forcing a minimum supported rate(see pages 300-301 of Sybex CWNA-106 book, also page 218 for OFDM) of 54Mbps. And, I also know that all of our devices are 802.11ac.

Now comes the roaming part, which we really do not do. Since we run at 54, and know that the our devices will be very close, roughly 20-23 feet lines-of-sight propagation to the Access Point(if not closer). They *should* not have too much of an issue with decoding the higher modulation rate(see pages 640-643 Sybex CWNA-106).

Now, this is not a perfect theory of why this works for us, our office is all concrete floors and ceilings. with lots of lines-of-sight propagation to other Access Points.

However, I’m pretty sure we have a Near/Far issue due to our AP layout, think of it as as big “L” shape, with lots of metal and concrete walls, sitting in the “arm” of the “L”.

Or……are we just hitting the point of demodulation issues on that far away AP, since we’re at 54?

Security for you, but organized.

Enjoying time with like minded folks, majority of which deal with Security related issues daily was how I spent a week in June, 2019. Security Field Day 2 was that week of learning. We saw many products, and one of which truly caught my interest was Demisto.

Let me explain, have you ever needed to track down a security issue? You probably started off with a sticky note, wrote some ports and IPs down, then later that became an email. Then, that email became a reply, 10-20 emails later you have this mess of information. Maybe you have an outline of shared docs in G Suite or Office 365. This mess of shared information maybe started on Monday and now it is Friday. You see where I’m going with this time-bomb of information being collected. Lets say a few days or weeks pass, how the heck would you come back and try to figure out what started this mess?

…..in walks Demisto.

I could write a few more paragraphs of how Demisto helps with Incident Management and Response, but this video is way cooler, so watch this short video:


Now for all the disclaimer info: My travel, hotel, food(tacos on Friday), drinks, social activities were all paid for by Gestalt IT(Tech Field Day). Was I asked to wear pants instead of shorts, yes–which was the only thing asked from me. Other than, be awake and dressed by 6AM some mornings. And, for those that know me, I have not worn pants in almost a decade. Tom told me I had to wear pants.