one thing is what you do… and you do it well.

Flashback to 2013 — I picked up a Synology NAS and, honestly, it was rock solid. Fast-forward over twelve years later, and while Synology still had my respect (no issues, super stable), I felt like it was time for a change. Not because it failed me — but because I wanted something a little more focused.

Here’s the thing: Synology does a lot. It’s got apps, media servers, Docker, file syncing, you name it. But me? I used it for one job — storage. That’s it. No Docker containers. No Plex. No fancy iSCSI mounts or NFS shares. I just wanted fast, reliable storage with a 10 Gbps port — and none of the extra fluff.

So I started looking around. That’s when I came across the Ubiquiti UNAS Pro — a slick little 2U, seven-bay NAS that’s been out for about a year now. After bingeing 40+ hours of YouTube reviews (yes, really), I thought: Let’s do this.

And wow — it nailed it.
Storage? Check
Speed? Check
Setup time? Maybe 10 minutes.
Dashboard? The classic Ubiquiti interface I already knew and loved.

If you’re already living in the Ubiquiti ecosystem, adding the UNAS Pro is a breeze. And if not, you can still run it standalone — but trust me, life’s just easier if you fold it into a Dashboard Site. You get better control, smoother configuration, and everything in one clean view.

So, if you’re like me — and just want your storage to be storage (no extras, no distractions) — this thing is a dream. Don’t expect it to run your media empire(hmm) or spin up VMs — that’s not what it’s for. It’s built for one job, and it does that job really well.

Bottom line?
UNAS Pro is simple, fast, and focused.
And in my opinion?
….. Absolutely perfect.

Amber and green or green and green are no longer a thing.

When I first heard about Etherlighting™ (a few months ago), my reaction was, “Hmm… okay, but why?”

For decades, we’ve had the same two little LEDs on switch ports—amber and green, or sometimes just green and green. This has been the standard for as long as I can remember—and that’s going back quite a few years. So, why change it?

Let’s think about what we’ve had until now. One LED typically indicates link status, while the other shows port speed. For example, amber might signal 100 Mbps, and green would indicate 1 Gbps. Some switches would use only green for gigabit speeds, and show nothing for lower speeds. You get the idea—but every vendor implemented this slightly differently.

Essentially, those little LEDs showed just three states. They’d blink like crazy to show traffic. And that was fine. Functional—but boring.

Then someone came along and changed it.

I kept asking myself: Why? Why mess with this?

Then it hit me: Damn, I wish this switch had Etherlighting™.

Let me explain Etherlighting™ in my own terms:
Take those two little blinking lights and toss them. Replace them with an RGB LED. That single LED can now represent virtually any color. Let’s say violet for 100 Mbps, and red for 10 Gbps. Suddenly, link status becomes instantly useful and visible. Not only to show link speed, but even VLAN assignments, blue for VLAN 20, or Green for VLAN 40(you see where this is going).

So why did I want a switch with Etherlighting™? Simple. Imagine trying to find and remove a cable on a crowded switch. You squint at tiny port numbers and risk pulling the wrong one. With Etherlighting™, you can highlight the exact port. One command, and that single port lights up clearly. No guessing. No mistakes. Now picture that across five 48-port switches in a rack. Yeah, it makes a difference.

As of now, Etherlighting™ is unique to Ubiquiti. I believe (and hope) they’ll eventually roll it out across their entire switch lineup as models get refreshed.

Now, some might say, “But the cable boot blocks the LEDs anyway.” True—if you’re using those old snagless designs that haven’t evolved in decades. Ubiquiti’s patch cables, however, have frosted/clear jacks that allow the LEDs to shine through the connector—and honestly, it looks cool. TrueCable offers something similar too (personally, I like their black patch cables).

To me, this is the evolution of the switch port. Now, when I look at a switch, those LEDs mean something. They provide actual value. Sure, it might only save a few seconds here and there. But time is the one thing you can’t get back. And if Ubiquiti is trying to give me a little more of it, I’ll take it.

Makes me wonder—what else is Ubiquiti doing to save me time?

one click buy is the new enterprise

I have been reflecting on these thoughts for the past year, ever since Ubiquiti hosted its UniFi World Conference in 2024. Initially, these reflections amounted to ten pages of unstructured ideas, but I finally took the time to distill them into a central theme: Enterprise.

Looking back over the past five years and projecting forward to the next five or ten, I question whether the concept of “Enterprise” as we know it today will remain the same. The answer, in my view, is no—it will inevitably evolve.

Ubiquiti appears to be embracing a direction that many companies are slow to recognize or adopt. The traditional model of engaging value-added resellers (VARs) or intermediary vendors to accomplish tasks may no longer be necessary. Instead, organizations need skilled professionals who are empowered with business process expertise—individuals who can drive initiatives forward without unnecessary layers of bureaucracy. Businesses are increasingly shifting toward leaner, highly capable teams that can adapt and optimize networks independently.

A prime example of this shift is Ubiquiti’s online store. Consider the traditional process of purchasing enterprise equipment from industry giants (e.g., “Big Green” and “Orange”). It typically involves multiple interactions with sales representatives, engineers, and distributors—only to later discover that the product is out of stock, requiring further adjustments. Contrast this with the seamless experience of ordering from an online store like Amazon Business, where business-critical hardware can be delivered in two days or less. This efficiency empowers teams to drive change and improvement within their organizations without unnecessary delays.

At the conference, the term Enterprise emerged as a central theme. However, I have always found the term ambiguous, as its meaning varies widely. Some define it as supporting specific systems or navigating complex sales channels. But why? In many cases, the justification seems to be “because that’s how it has always been done.”

This mindset is problematic. Technology evolves rapidly, and what was considered best practice six months ago may already be outdated. The industry must be willing to adapt now, rather than clinging to legacy approaches.

Ten months is a long time in the tech world, and significant advancements have been made. Previously, I would have said that Ubiquiti had an “Enterprise problem”, but now, I believe the real challenge is one of scale. However, recent product releases and announcements have begun to dismantle those previous concerns.

The key question is: Have you tried it?

I am not suggesting that Ubiquiti is a universal fit for every enterprise use case. But as with any technology provider, a holistic implementation is necessary to truly evaluate its capabilities. Deploying a single component in isolation rarely offers a comprehensive understanding of a system’s potential. This is precisely why empowered, skilled teams are essential for driving network innovation.

Ubiquiti’s approach to enterprise networking is not just about today or tomorrow—it is positioning itself for the future. And to me, that strategic foresight makes all the difference.

As organizations continue to evolve, so will their applications and internal processes, enabling agile teams to execute with confidence. Perhaps in the near future, Ubiquiti’s online store will introduce an API for seamless integration with billing systems—a development that could further streamline operations.

The future of enterprise networking is shifting, and companies must be ready to adapt.

Doing static versions.

Most websites are static HTML pages. However, people continue to spin up infrastructure based on a web server, which could run Apache or Nginx. But, you want to keep costs low. You can use DigitalOcean, but I’m an AWS guy, so we’ll do things the AWS way.

So let us talk about the goal. The more you focus on Cloud-based infrastructure, the more you understand it’s not about the hardware, instead it is the software or code. And being able to version control your system is fantastic. This goes along with being able to version your infrastructure, as your hardware is no longer a lovely little pet you maintain, it has become the cattle that you slaughter and eat. Meaning you don’t care about it; if it becomes an issue, you delete it and move on.

If you plan on doing a Blog site, your best bet is to pay the small yearly cost to WordPress.com; they do a fantastic job. But, most websites are just posting simple information. Think of a restaurant. How often does that experience change? The menu might change weekly, monthly. But contact information, location, etc.. does not. This is where a static hosted web page is perfect. 

Now since we all love Google, I did a quick search using these keywords:

automate static S3 GitHub

AWS is very powerful, and someone else already made a blog post covering what I wanted to explain:

Automate static website deployment from Github to S3 using AWS CodePipeline – sithum DevOps

So you follow that post, it will do everything you need – if you’re using GitHub. It shows how to create a code pipeline that will commit updates to S3 when you submit changes to your GitHub project. A couple of parts are left out, for example, SNS, Amazon Simple Notification Service. This is used to set up Email or SMS notices for your pipeline, i.e., success, fail, or manual intervention is needed if something happens to your pipeline. And, you need to have your S3 buckets already created. I’ll post another article going over what I would call “AWS 101”, which will outline security, billing, and alert notices to do first in your AWS Account. 

Another little thing to add to this pipeline would be to invalidate CloudFront data(CloudFront is a CDN, that distributes your content from an Origin-yours being S3-to geographically located servers around the globe). Just because you updated S3 with newer code doesn’t mean you would be sending the most up-to-date information, that is, if you’re using CloudFront. With CloudFront, you would need to let the content expire on those geographic servers, usually 24 hours. Then a new pull from your Origin would be done, or you would process an invalidate request-which deletes that file(s) from the cache on the servers(however, this can be costly if you are continually invalidating single files all the time). But talking about CloudFront is for another post. 

Also, keep in mind each time you process your pipeline, i.e., submit updates. This will push new content into S3. And, having an “active pipeline” does cost $1.00/Monthly. Now, this cost does not include the other service costs that might be associated with running the pipeline, i.e., transit data costs etc… So keep that in mind.

I’m going to leave it that way.

After doing more research on roaming, and diving deeper into the beautiful parts of 802.11k/r/v and OKC. I’m going to leave all the previous blog posts just the way they are. And that reason is, I know they’re not 110% correct; however, they have the spirit of Wireless involved and point out things to consider, test, and evaluate in your environment. Lots of blog posts exist that say “do this, to resolve this,” but I feel they do not ask questions, but tell you this tool does this, vs. examing all parts involved.

So, I’m going to leave it that way. And, if you’re new to Wireless, I feel this will allow you to think about things and examine everything on your wireless network, and your client device being an import ever-evolving piece.

All the bells, or having 802.11k/r/v on.

Now we’ll turn on 802.11r and do the same thing as we did outline in this post. Our test SSID has 802.11k/r/v enabled, and I instantly noticed with 11r enabled how quickly my client switched from one AP to another. I noticed this when I was walking away from Access Point c4 and where I rejoined AP 23. As I walked away from AP 23, I joined c4 in roughly the same spot as yesterday. However, when I walked back towards AP 23, I joined closer to the AP vs. when I walked past the AP. 

So here we see a little section of my office, I started in the back(the top of the image) and walked towards AP c4, which is on the bottom of the image. The little red “X” marks the AP locations, 23 at the top and c4 at the bottom. As I walked towards c4, the green X marks when I saw my device change. I then waited about three seconds; then I walked back to AP 23. The blue X is where I saw the client change to AP 23.

Now, if we look at the join locations with when 11r disabled, we’ll see something different.

I joined AP c4 in roughly the same spot, but when I walked back to AP 23, I didn’t rejoin until almost the same spot as where I started.

It shows that over two days, my device would join AP c4 in roughly the same spot. However, AP 23 acted differently. Reasons could be my device went to sleep, and I didn’t notice as I walked back around AP 23, which would cause it to join at a later physical spot.

Or, maybe the device did roam correctly, but thought it needed to stay on AP c4 longer, the sticky client scenario — remember client devices ultimately make the roaming decision, not the Access Points.

Looking anyways…

In a previous blog post, I was going to capture using two Access Points with 802.11r disabled. It was disabled but, 802.11v was baked into the firmware. This slowed me down(not in the roaming sense, how I was doing my setup). But I needed to continue with this test to see how fast things moved. So if you look back at this post, it talks about what devices and how I created the SSID to look. I did disable 802.11r, but I’m still going to use 802.1X(capital X). Why not just WPA2, well, because I’m using RADIUS. And, the end goal is to see about using a Cloud RADIUS.

So, I have my test setup, and I’m walking from one Access Point to the other. I nice handy tool I use to see if I have roamed visually is called Network Analyzer. It quickly shows my current BSSID and also has an IP block Scanner. So somewhat handy.

During my little walk, I had my MacBook capturing the channel I had set both Access Points on. And, used Airtool for the packet capture.

Now that I have my frames captured, in the wireless world, packets are called frames. I can narrow down what to look for as my capture was over 14,000 frames(yeah, I have lots of other things on these APs, 10 Chromecast devices are very, very chatty).

But what do I look for? Since we’re moving between Access Points, you need to look for what is called Association and Reassociation requests.

You loaded your pcap into Wireshark, now time to filter down for what you’re looking for.

And, thanks to François Vergès for having this handy “Wireshark Most Common 802.11 Filters” PDF, searching is now 100% easier in Wireshark.

wlan.fc.type_subtype == 0x0

wlan.fc.type_subtype == 0x2

From the handy chart, we need those two options, if you combine those, you should have something that looks like this:

(wlan.fc.type_subtype == 0x0) || (wlan.fc.type_subtype == 0x2)

I see the frames we’re looking for, but now I need to find the MAC of my client.

i.e. wlan.addr == CC:46:D6:00:00:00

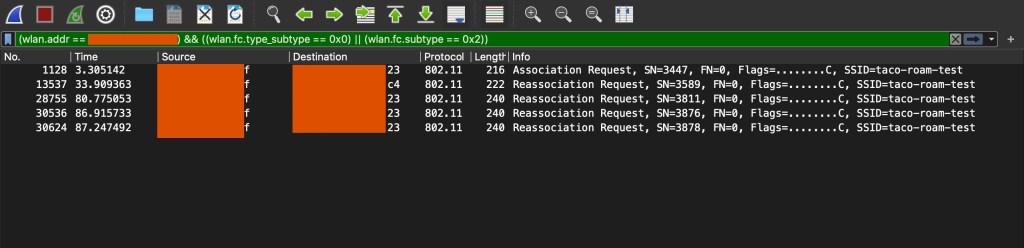
And then we combine all that Wireshark magic and then we’re shown a few lines from the pcap.

(little disclaimer – that first pcap image didn’t have everything I needed so I made another pcap and filtered for what we need.)

So here’s what we have now, with just 802.11v enabled on this “taco-roam-test” SSID. You can see my client device connect to the first Access Point ending in 23, then me walking to the next AP ending in c4, then back to 23.

So about 3.3 seconds in, I join the SSID, then checked to make sure I have an IP address, then switch over to the Network Analyzer app, then start walking towards AP c4. Now once I saw in the Analyzer app that my device changed BSS units, I walked closer to that AP a few more seconds then started walking back towards AP 23. I was trying to walk the same path again. Also, my office is roughly 10,000 Sq ft. I probably walked about halfway between the APs before it switched, which would mean about ~40 feet away from AP 23. Also, both radios are set for 19 dBm(no external antennas).

So, what did we learn, well nothing yet, other than a roam from and back to an Access Point. Well, yeah, we learned about some tools and how to filter with Wireshark. Now I need to enable 802.11r and do it all over again.

Also, here’s a little handy Column you should add to Wireshark, Time Delta. Right-click on a Column section, select Column Preferences. Hit the “+” to add a Column, give it a Title, I called my Time Delta. The type will be Custom, then enter the following in Fields:

frame.time_delta_displayed

Now you have a Column that shows the Time Delta.

Roaming the Fog way or using on-site RADIUS.

So just like the title says, hey, we’re going to see what roaming using on-site RADIUS looks like.

This is our baseline: In our network, we’re going to disable 802.11r, and test using two Access Points on the same channel, because I don’t want to get too technical, and only want to capture on one channel. As only capturing on one channel will make this easier for folks at home. And, my capture device only has one interface anyways. 

We’re going to set up a test SSID; we’ll call it “taco-roam-test”, and we’re going to use 5 GHz, channel 36, and 20 wide. Something easy that you should have at home. 

Now, since we’ll be doing this test using different RADIUS options, this one using an on-site RADIUS. And, the second will be with a Cloud-based RADIUS option. We need to have a constant, and that will be our testing device. 

Our test device will be an iPhone XS Max, running iOS 13.4.1, the reason why I’m using an Apple device, this device is what I have and like. And, my capture device will be a MacBook 2017, space gray if you must know.

Now that we know about the device, we need to understand how Apple does roaming. And, Apple is really good about providing this documentation. Yet, another reason I’m using Apple devices for this “test”. 

So, I ran into a small issue. 

SSID showing 802.11v support.

I want to disable 802.11v support. And, that is baked into my Access Point firmware. So apparently this is used for the keywords of “load balancing”. Since 802.11v is used for BSS Transition, and my client supports 802.11v, my client will have some assistance. Which is what I do not want. Time to find a more generic Access Point.

Do you really love The Cloud?

You really should love The Cloud, if you don’t, well, stop reading. But, I need to use RADIUS with Wireless. And therein lies the rub! Once you try or move things to The Cloud this little part that is considered critical still exists. That little part is RADIUS. 

If you have some Windows Servers still in use, you could be fine. However, with Windows 10 and Azure Active Directory. Why even have on-site servers? Well, that RADIUS part still needs to be around. 

You can do a few different things, you can use JumpCloud that talks to O365/AAD and that works, but you have that little issue of delay for roaming. The other option is using NPS on a Windows Azure AD attached server and placing that in Azure(in The Cloud), or placing an on-site server running NPS attached to your O365/AAD site. That will reduce the delay, but you have on-site servers you need to maintain. 

So you mention the issue with delay, what are you talking about? Well, if you roam you need to authenticate. But you have key caching involved too? Wouldn’t that speed up the roaming? True, but I figure the goal is keep everything below 150 milliseconds round-trip. 

The goal is to be 100% Cloud based using services vs. servers. Why do you want to maintain servers?

Am I fast roaming?

When roaming on a wireless network, in very basic terms, here are some things you should look for. You can roam using what I call a tear down and rebuild, i.e. you’re on a wireless network – you then move out of range of an Access Point and your connection is then destroyed and rebuilt on the next Access Point you join. That’s nice, however, if you’re on a FaceTime call or using a VoIP application you’d like this to be as fast as possible. So here are some things to look for and maybe enable on your wireless network. I’m going to explain some Amendments to 802.11 that you should enable and test on your network. 

The first is 802.11r, in very basic terms this allows your client to move quickly, your wireless infrastructure needs to support this along with the client having support. Now this comes with some interesting side effects. One, being that not everything supports it. Yes, this has been an option for 10 years, however not all client devices know about it and once again, support it. For example, iPhone 4 and above support it, but macOS does not. However, macOS does support caching of keys to smooth that transition when moving between BSS units in the same ESSID. 

Woah? Wait a second, what is BSS and ESSID? OK, let’s step back a little and explain. You’ve heard the term SSID, Service Set ID, this is what you have called your Wireless LAN, i.e. TacoMonkey or FBI Van. Then you have your BSSID, which is Basic Service Set ID. Think of this as multiple Access Points in the same Wireless LAN(technically it’s BSS) using the same name, i.e. SSID. Now an ESSID is the grouping of all those BSS, Basic Service Sets, under the SSID. Lots of times BSSID and ESSID are used interchangeably.

So you have three Access Points, those access points have a BSS and those units all live under an ESSID. Now to route network traffic, each BSS has a MAC address and that MAC address talks to your Client MAC Address. This is how the wireless network knows what Access Point is close to what client and how to move traffic around, because wireless is still Layer 2. 

Second thing to look for, is 802.11k, think of this as moving with some visibility, or where it makes sense, i.e. Assisted Roaming. Instead of the client scanning channels and looking around for the same ESSID, the wireless infrastructure will help and provide that information. Most of the time it will be your connected AP then the next AP that the client will be told about. I’ve heard it’s usually around 10 surrounding APs that a client will get information about. This is different depending on what your infrastructure supports. So take that with a grain of salt. 

And lastly look for 802.11v. Two main things come along with 802.11v, one being power setting information and another being topology information, i.e. how is this network designed(in simple terms). Why would I care about power settings? 

Let us take this example, you have three Access Points in a triangle configuration. Your client is sitting off to one leg of the triangle. If all Access Points in the ESSID are set for 18 dBm, then your client could connect to the furthest physical AP. In some cases that could be fine, however if I’m going to be next to an AP all the time, why not adjust that power a little higher than the others. This will help in assisting where your client should go. A key factor is also understanding how your client will roam, i.e. does it look for a certain RSSI, channel width or preferred wireless band? 

Things to remember, not all devices can work with 802.11r, if you have that enabled on your wireless network and require it, your client device might be unable to connect. In the Cisco world they have an “Adaptive” option instead of “Required” for non-11r supported devices to connect. Now remember with 802.11 devices, the client still chooses where to roam, however with 802.11k/r/v, we influence the client to make better choices. 

Now that you have an idea of what to look for on your wireless network, how do you know if these are enabled? On macOS, it’s very easy, a Mac app called WiFi Explorer is available. Just make sure you head to Preferences and enable the Amendments column. 

A little disclaimer, make sure you check your client devices for support, especially for 802.11r. And, it is best to set up a new SSID to check these settings, also several vendors have 802.11k enabled by default.